
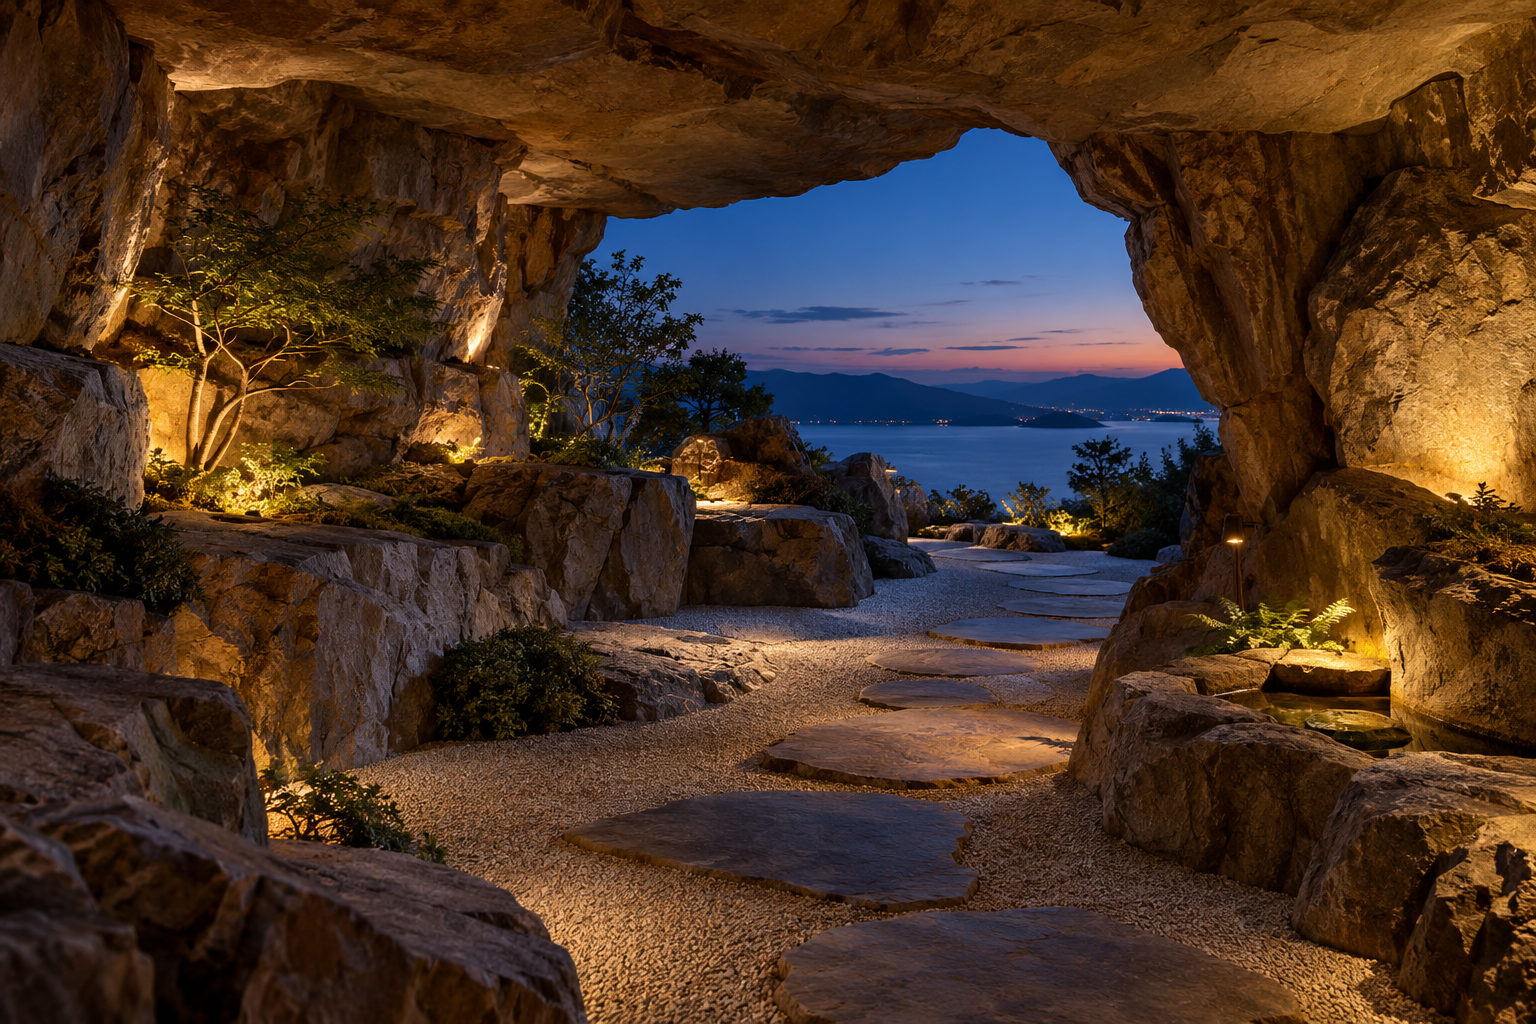
A grotto loses its depth when every surface receives equal light. The ceiling flattens, the far wall advances, and the small shadows that describe the rock disappear. Yet simply making the space darker can leave the route difficult to read and put a bright fixture directly in a seated visitor’s eyes.
Good grotto lighting is selective. It gives circulation a clear visual path, lets a few surfaces explain the enclosure, and leaves quieter areas between them. The design question is not how to illuminate every rock. It is which parts of the scene need to be understood, and from whose viewpoint.
A: No. Selective illumination can preserve depth and visual rest.
A: No. Functional illumination must support safe use and applicable requirements.
A: A low viewpoint may expose a source hidden from standing visitors.
A: No. Evaluate the actual material under the proposed source.
A: It emphasizes texture by creating strong small-scale highlights and shadows.
A: Yes, when moving water is part of normal use and may create reflections.
A: Not necessarily; aiming and reducing competing light may help more.
A: Yes, when it suits the setting and required functional lighting remains effective.
A: Replacement or maintenance can unintentionally alter the original composition.
A: Qualified professionals familiar with the specific environment and applicable requirements.
Build the night scene in three layers
First, make the route understandable
The entrance, walking surface, changes in level, and destination should read as a connected journey. A decorative wall accent cannot substitute for illumination needed to use that route. Start with the functional lighting design and applicable requirements, then compose the theatrical effects around it.
Observe the transition from the surrounding garden into the grotto. A very bright approach followed by an abrupt dark recess can make the entrance feel visually uncertain. The relationship between adjacent areas matters as much as the brightness of either one considered alone.
Next, reveal selected forms
Choose a small number of rock faces or edges that explain the space. A side-lit ridge can suggest the shape of a wall without lighting its entire surface. A softly revealed ceiling edge can make the enclosure legible while allowing the upper recess to remain subdued.
Light grazing close to a rough surface emphasizes relief and shadow. Moving the source farther from the surface or changing its direction produces a different reading. Test the actual texture; a finish that looks calm in diffuse daylight can become very busy under strong grazing light.
Finally, establish the focal point
The focal point might be a small water surface, a distinctive rock face, or the view through the opening. It does not have to be the brightest object in every direction. Think about where attention should settle after arrival and whether another fixture accidentally competes with it.
A view outward can be especially effective. Lighting the interior too strongly may diminish the evening garden beyond, while restrained interior accents allow the opening to remain part of the composition. Review the scene from the seat rather than only from outside the grotto.
Hide the source from the person, not just from the camera
A fixture concealed in a rendering may be exposed to someone sitting lower or approaching from the side. Check standing and seated viewpoints, including the route into the space. The visible bright source can become more distracting than the surface it was intended to illuminate.
Shielding and aiming help direct light toward the task and away from unwanted views. They also matter beyond the grotto: a beam escaping through the opening may reach neighboring windows or the night sky. Evaluate the whole distribution rather than treating spill light as an unavoidable side effect.
Wet surfaces add another layer. A glossy rock face or moving pool can reflect a source that is not directly visible. Run the water during the lighting review when that represents normal use. A dry evening mockup cannot reveal every reflection that appears in operation.
Use color to support the material
Warm light can complement ochre or sandstone-like surfaces, while a more neutral appearance may suit other palettes. The choice should be made with the actual finish samples. Correlated color temperature describes one aspect of the source; it does not by itself tell you how every pigment will appear.
Color-changing effects can suit a themed setting, but they need a reason to exist. A saturated wash across every surface can erase distinctions between materials and dominate a quiet retreat. Consider whether a restrained everyday scene should remain available alongside special-event settings.
Give each lighting group a job
| Group | Purpose | Review from |
|---|---|---|
| Route lighting | Make arrival and movement legible | The approach and each change in direction |
| Rock accents | Describe selected forms and textures | Standing and seated positions |
| Focal lighting | Establish a destination for attention | The principal occupied area |
| Service lighting | Support inspection and maintenance | The actual work locations |
Aim before adding more fixtures
When a scene feels flat, more output may make it flatter. Try changing the direction of an accent, reducing a competing source, or leaving a secondary surface unlit. These adjustments can restore hierarchy without filling the grotto with equipment.
A temporary lighting mockup is valuable because small shifts in position can produce large visual changes on irregular rock. Record the approved aiming and control settings. Otherwise, a later maintenance visit may restore power but leave the original composition altered.
Design for replacement as well as the opening night
Fixtures in wet or pool-adjacent locations require equipment and electrical design appropriate to that environment. Coordinate mounting, wiring, access, and protection with the responsible professionals. A hidden fitting is not a successful detail if replacing it requires breaking the finished rockwork.
Separate everyday scenes from inspection and cleaning needs where the design allows. Staff may need a different lighting condition from visitors. Controls should make those uses understandable without encouraging decorative settings to replace required functional illumination.
The finished grotto should contain a deliberate range: readable routes, modeled surfaces, a few points of emphasis, and areas of rest. Shadows then become part of the design rather than evidence that a fixture was forgotten.
Related Articles
Why Some Waterfalls Roar: Planning the Sound of a Grotto
Explore waterfall sound through impact, reflected noise, equipment, seating position, and the intended grotto experience.
Resort Grottos That Feel Like Places: Seating, Privacy, and Guest Flow
Design resort grottos around guest arrival, seating choice, privacy, accessible circulation, service, and comfortable departure.
Pool Grotto Layouts: Balancing Shelter, Sightlines, and Swimming Space
Compare pool grotto layouts through shelter, swimming routes, sightlines, seating, and waterfall placement.